
Table of Contents
I still remember the excitement of watching Pokémon as a kid. Delibird was always a standout character. Its festive and fun personality makes it perfect for a party dish. That’s why I’m excited to share how to make a fun delibird recipe with you.
Making delibird is easier than you think. With the right ingredients and kitchen tools, you’ll create a delicious and unique dish. Whether you’re a Pokémon fan or just looking for a tasty dish, this recipe is sure to impress.
As we explore delibird-inspired cooking, I’ll share my own experiences and tips. We’ll cover essential ingredients, kitchen tools, and decorating tips. So, let’s start this culinary adventure and learn how to make a fun delibird recipe for your next party.
Introduction to Delibird Recipe
In this article, we’ll guide you through making a delibird recipe. We’ll cover essential ingredients, kitchen tools, and decorating tips. We’ll also explore the inspiration behind this festive dish and why it’s perfect for your next party.
Key Takeaways
- Learn how to make a fun delibird recipe for your next party
- Discover the essential ingredients and kitchen tools needed for the recipe
- Get decorating tips and tricks to make your delibird dish stand out
- Explore the inspiration behind the delibird recipe and its festive personality
- Find out how to make a unique and tasty dish for your next party
- Get a step-by-step guide on how to create a delibird recipe
- Learn how to make a delibird recipe that’s perfect for Pokémon fans and partygoers alike
Meet Delibird: The Inspiration Behind This Festive Dish
Exploring Pokémon, I’m thrilled to introduce Delibird. This character captures the essence of fun and festivity. Its red and white colors make it a great theme for a party dish. Let’s dive into what makes Delibird special and how it can make your party unforgettable.
At parties, food is the main attraction. That’s why I’ve made a delibird cooking guide. It’s packed with delibird meal instructions to help you make a tasty, eye-catching dish. Your guests will love it.
- Its festive colors are great for holiday parties and celebrations
- Its fun and playful nature will make your guests smile
- It’s versatile, letting you make many dishes and desserts inspired by Delibird
By using my delibird cooking guide and delibird meal instructions, you’ll create a memorable party. Your guests will remember it for years. So, start today and see what festive treats you can make with Delibird as your guide.
Essential Ingredients for Your Delibird Recipe
To make a tasty Delibird-inspired dish, you need some key ingredients. The delibird dish recipe calls for flour, sugar, eggs, and food coloring. These will help you get the right taste and look for your dish.
The quality of your ingredients is very important when following delibird cuisine steps. You can use regular flour, white sugar, and big eggs. For coloring, pick red and white to match Delibird’s colors. Here’s what you’ll need:
- 2 cups of all-purpose flour
- 1 cup of granulated sugar
- 2 large eggs
- Red and white food coloring
With these ingredients, you can start making your Delibird-inspired dish. Just remember to follow the delibird dish recipe and delibird cuisine steps carefully. This will help you make a delicious and festive dish.
Kitchen Tools and Equipment You’ll Need
Having the right kitchen tools and equipment is key for delibird food preparation. As I get ready for the delibird recipe tutorial, I want to make sure I have everything. This includes basic cooking tools, special decorating equipment, and optional advanced tools.
First, you’ll need basic cooking tools like a mixing bowl, measuring cups, and a baking sheet. These help you measure, mix, and bake ingredients easily. For delibird food preparation, a reliable oven and sharp knives for chopping are also crucial.
Cooking Essentials
- Mixing bowl
- Measuring cups
- Baking sheet
- Sharp knives
Decorating Equipment
You’ll also need special decorating equipment for a festive touch. This includes frosting, sprinkles, and other edible decorations. With these, you can make a delibird recipe tutorial that’s both tasty and beautiful.
Preparing Your Workspace for the Delibird Recipe
To make a great delibird recipe, start by setting up your workspace. Clear a flat area, collect all ingredients and tools, and heat your oven. This way, you can focus on cooking without any rush.
For a successful delibird recipe, a tidy workspace is essential. Here are some tips to help you:
- Gather all the necessary ingredients and tools before starting the recipe
- Clear a clean and flat surface to work on
- Preheat your oven to the required temperature
By following these steps, you’re on your way to a tasty delibird recipe. Stay focused and enjoy the cooking process. Soon, you’ll be a pro at making delibird recipe.
Consider getting some key tools like a mixing bowl, measuring cups, and a baking sheet. They’ll help a lot when making your delibird recipe.
Now, your workspace is ready. Next, we’ll talk about the ingredients and tools you’ll need for your delibird recipe.
Step-by-Step Guide to Creating the Base
To start making the base of your Delibird-inspired recipe, it’s key to follow a delibird cooking guide. This guide outlines the steps you need to take. We’ll give you a detailed delibird meal instructions to help you make the perfect base for your dish.
First, let’s start with the foundation of our recipe. A great Delibird-inspired dish needs a solid base. This is where the delibird cooking guide helps, giving you a step-by-step guide to creating the perfect base.
Mixing the Main Components
When mixing the main components, it’s important to follow the delibird meal instructions closely. This means combining the right ingredients in the right amounts. By doing this, you’ll get a base that tastes great and looks good too.
Shaping Your Delibird
After mixing the main components, it’s time to shape your Delibird. The delibird meal instructions are crucial here. They help you shape the base into the iconic Delibird form. With these instructions, you’ll get the perfect shape and size for your dish.
Initial Baking Instructions
Now, it’s time to bake your Delibird base. The delibird cooking guide will give you the initial baking instructions. By following these instructions, you’ll get a delicious and crispy base. This will surely impress your guests.
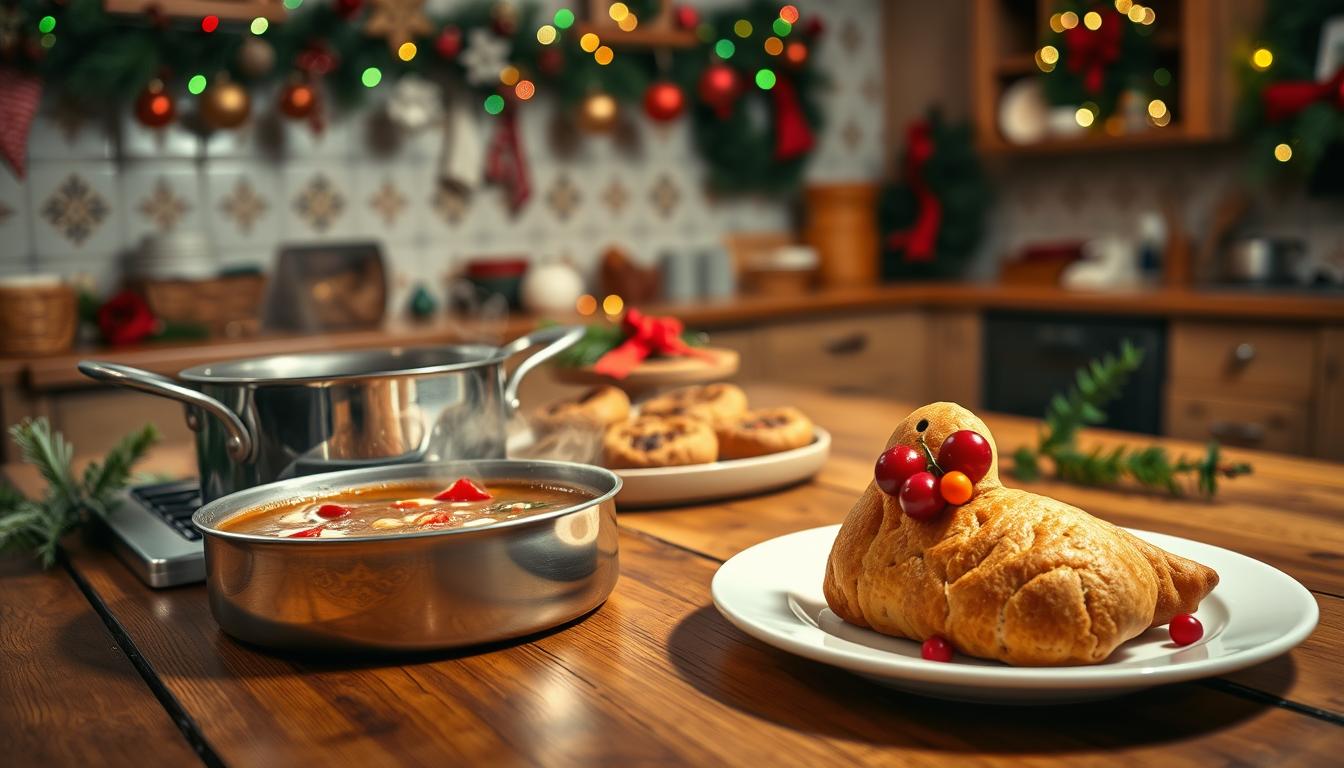
Crafting Delibird’s Signature Features

To make your delibird dish recipe stand out, focus on its signature features. The steps to create these features are simple and need just a few ingredients. First, you’ll need to make the red and white stripes that define the delibird. Use frosting for these stripes and add sprinkles for extra sparkle.
Getting the colors right is crucial. Mix red and white frosting for a striped look that’s both festive and fun. Add black frosting for eyes and a beak to bring your dish to life. Pipe the frosting in a horizontal pattern, alternating between red and white for the stripes.
Adding texture and dimension is key. Use sprinkles or other toppings for a fun, festive look. Ideas include edible glitter, nonpareils, or small candies. Have fun and get creative with your choices!
By following these steps, you’ll make a delibird dish that’s tasty and looks great. Remember to have fun and be creative with your toppings and frosting. Don’t be afraid to try new colors and designs. With practice, you’ll master crafting delibird’s signature features in no time.
Adding the Festive Colors and Details
As I work on my delibird dish, I’m excited to add festive colors and details. This part of the recipe tutorial is where my creativity shines. I’ll start by making a red and white pattern, a classic for Delibird-inspired dishes.
To get this look, I’ll mix frosting and sprinkles. For the red, I’ll use top-notch food dye for a bright color. The white will come from powdered sugar and cream, giving it a smooth feel.
- Use a piping bag for detailed designs and patterns with frosting.
- Try different sprinkles, like nonpareils or jimmies, for texture and interest.
- Display your dish on a turntable to show it off from every side.
By using these tips, you can make a stunning Delibird-inspired dish. It’s sure to wow your friends and family. Have fun and get creative with your recipe. Don’t hesitate to try new colors and decorations to make it unique.
Making the Special Delivery Bag Element
To finish the delibird recipe, we must make the special delivery bag. This bag is a key part of Delibird’s look. It’s important to focus on this detail when learning how to make delibird. A few simple steps can help you create a bag that looks festive and realistic.
Choosing the right materials is crucial for a great delivery bag. You can use sugar paper or wafer paper, which are easy to work with. These materials can be shaped to look like Delibird’s bag. When looking for how to make delibird, consider these edible options for a more authentic look.
Edible Bag Options
- Sugar paper: A popular choice for edible decorations, sugar paper is easy to shape and can be colored to match Delibird’s signature red and white hues.
- Wafer paper: Thin and delicate, wafer paper is perfect for creating intricate designs and can be used to add details to your delivery bag.
Filling Ideas
After making your edible bag, think about what to fill it with. You can use small candies, chocolates, or nuts for a fun surprise. Use red and white candies to match Delibird’s colors and add festivity to your creation.
Party Presentation Ideas

When presenting your Delibird-inspired dish, aim for a festive and fun vibe. Use colorful plates, napkins, and tablecloths to match Delibird’s red and white theme. Add festive decorations like balloons, streamers, and a “Happy Holidays” banner to set the mood.
To highlight your Delibird dish, use a decorative platter or cake stand. Here are some ideas to get you started:
- Use a delibird meal instructions guide to create a themed menu card to place next to the dish.
- Add some edible decorations such as candy canes, holly sprigs, or snowflake-shaped cookies to the platter.
- Consider creating a Delibird-themed backdrop using cardboard, paper, or fabric to take photos with your guests.
Remember, have fun and be creative with your party presentation ideas. With a little imagination, your Delibird-inspired dish can become a show-stopper. It will impress your guests and make the party unforgettable.
Storage and Make-Ahead Tips
Proper storage is key to keeping your delibird dish fresh. You’ve put a lot of effort into making it, so you want it to stay delicious. Cool your dish completely before putting it in an airtight container.
This prevents moisture from making it soggy. You can keep it in the fridge for 3 days or freeze it for 2 months. Always follow the reheating instructions to avoid overcooking or undercooking.
Proper Storage Methods
- Use an airtight container to store your delibird dish recipe
- Label the container with the date and contents
- Store it in the refrigerator at a temperature of 40°F (4°C) or below
Reheating Instructions
To reheat, use the oven or microwave. For the oven, preheat to 350°F (180°C) and heat for 10-15 minutes. For the microwave, heat on high for 30-60 seconds. Be careful not to overheat, as it can dry out.
Troubleshooting Common Issues
Even with the best delibird recipe tutorial, things can go wrong. I’ve found a few common problems in delibird food preparation. These can be fixed with some simple troubleshooting tips.
Common issues include overmixing, which makes the texture dense and tough. Or, underbaking can make the center soft and soggy. To fix these, follow the recipe carefully and adjust as needed.
Here are some tips to troubleshoot common issues with your delibird food preparation:
- Check your oven temperature to ensure it’s accurate and consistent.
- Don’t overmix the ingredients, as this can lead to a tough texture.
- Keep an eye on the delibird while it’s baking, and adjust the baking time as needed.
By following these tips, you’ll avoid common problems. This way, you’ll make a delicious and impressive delibird dish. With practice and patience, you’ll master delibird recipes. Your delibird recipe tutorial will be your trusted guide in the kitchen.
Conclusion: Serving Your Delibird Creation
Congratulations! You’ve made your own Delibird-inspired recipe. It’s a tasty treat that will wow at your next party. You followed our guide to create a festive and flavorful dish.
As you get ready to serve your Delibird, admire your work. The red and white colors, the details, and the “delivery bag” make it unique and eye-catching.
The fun of this delibird recipe is in making it. Be creative and try new things. The how to make delibird journey is just as important as the result.
When you share it with others, enjoy their praise and smiles. Delibird has brought another tasty treat to your party. Take photos to share on social media and cherish the moment.